In this week, class has been held in studio for one hour. En. Phuaat taught us on photography equipments in the studio. The type of camera used, the lightning in studio and the background for photo shoot.
Later i will upload some picture in my blog such as the picture of our studio looks like, the camera used and etc.. Since I don't have copy of the picture right now. So, yeah.. later I upload it.
Outdoor shooting was done at Tasek Ilmu UTM. I'm so tired that day.. hikhik.. Cuz of the hot weather and dehydrated.. huuu.. And i forgot to bring my water.. So kinda "x larat" for the outdoor shooting..
Nothing to say much.. all of us were so busy to capture photos. Plus.. Our assignment due in two weeks more.. waaaahh... Not doing much yet.. Pressure arise.. huu..
Friday, 28 March 2014
Thursday, 20 March 2014
Week 6: Creative Capture and Composition
In week 6, we learned about creative capture and composition. Dr. Jamal taught us on composition and framing.
For composition and framing :
I learned that good composition is a key element to capture a good photographs... However, the good composition is hard to be defined.
Plus, there are 5 good composition guideline that i learned in photography :
1. Simplicity
2.The Rule of Thirds
3. Lines
4. Balance
5. Framing
I will go through one by one what it meant by its 5 elements of composition.
1. Simplicity

For composition and framing :
- Use the space wisely
- Keep the camera level
- Make sure you draw attention to subject of photo
I learned that good composition is a key element to capture a good photographs... However, the good composition is hard to be defined.
Plus, there are 5 good composition guideline that i learned in photography :
1. Simplicity
2.The Rule of Thirds
3. Lines
4. Balance
5. Framing
I will go through one by one what it meant by its 5 elements of composition.
1. Simplicity
- Look for ways to give the center of interest in your pictures the most visual attention.
- One way is to select uncomplicated backgrounds that will not steal attention from your subjects.
- For example:
"Just One Subject: A frame that has just one attractive subject and not a thing else—no clutter in the background and nothing else in the foreground—can help highlight the subject dramatically. Some examples: a beautiful white flower with completely dark background, portrait of a person, bird or animal with uniform background that contrasts the colour of the subject, etc. Do keep in mind that it is important in such cases that the subject be charming in itself. A colourful bird or a beautiful flower has the power of attracting the viewer with ease. "
Source : http://travel.paintedstork.com/blog/2011/08/travel-photography-power-of-simplicity.html

5.Framing
2. The Rule of Thirds
- Divide a photo into thirds both horizontally and vertically
- Horizon line should be on one of the horizontal lines
- Place main subject in either 1/3 or 2/3 of the frame
- Use “sweet spots” for perfect placement
- The intersections of these imaginary lines suggest four options for placing the center of interest for good composition
- For example:
 |
| Source: Darren Rowse (2014) |
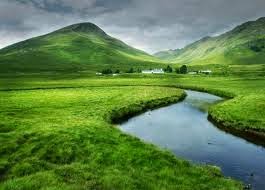
3. Lines
- Straight lines in a composition to lead the eye of viewer
- For example:
 |
| “Allegro North Peir at Sunrise” captured by Coy Aune |
- The S curve
 |
| Source : http://www.photographyicon.com/line/ |
- There are many lines you can do besides the two lines i mentioned above.You can read more on Leading Lines in Landscape Photo Composition
4.Balance
- Good balance is simply the arrangement of shapes, colors, or areas of light and dark that complement one another so that the photograph looks well-balanced.
- For example:
 |
| Symmetrical Source: Samantha Panzera's Photography |
- However, balance in composition does not mean it must symmetrical all the time.. They can be asymmetrical.
- For example:
 |
| Asymmetrical Source: SyaziMalik (2012) |
- Sometimes you've a object of huge dominance within a scene. While breathtaking on-location, the final picture looks often much less impressive due to uninteresting space around the object.
- Try to find a frame which can eliminate the unimportant and surrounding and focus the view.
- For example:
 |
| Source : Darren Rowse (2014) |
- A frame serves numerous purposes.
- It gives the image depth and helps to give the perception to viewers of it that they’re looking at something that is more than 2 dimensions.
- Use correctly, framing can draw the eye of the viewer of an interest to a particular part of the scene
- Framing can bring a sense of organization or containment to an image.
- This won’t work with every shot - but if you’re after a more ordered or formal feel it can be useful.
- Framing can add context to a shot.
- Frames can also be in the foreground or background of images (although more often than not they’re in the foreground).
In summary, to capture a good photography must master the good key element of composition skills in photography. Well, try to capture a good photo and good luck.. :)
Next week, class we'll be held in studio for an hour and outdoor shooting for the following hours with En. Phuatt.
Sunday, 16 March 2014
Play with Nikon D3000 (Practice)
Last Saturday morning, I went out with my friend Afi to shoot some photos at Tasek UTM. I shot a few photos using the Aperture Priority in DSLR Nikon D3000. Here are some of my photos. Not the very best, but i try to give my best when shooting since I'm still beginner in DSLR camera user.
Review: I shot this photo using Aperture Priority. I used the lower aperture which is f/5.6 so the image has a shallow depth of field. The flower is in focus while the rest of the picture is blurred.
Picture 1
 |
| f/5.6 | 1/200s | ISO 100 (Nikon D3000@35mm) |
Review: I shot this photo using Aperture Priority. I used the lower aperture which is f/5.6 so the image has a shallow depth of field. The flower is in focus while the rest of the picture is blurred.
Picture 2
 |
| f/5.6 | 1/160s | ISO 100 (Nikon D3000@35mm) |
Review: Picture 2 is the same subject with picture 1. However the background of the object is in focus while the flower is blur. This picture i shot using Aperture Priority with f/5.6. Now, I understand how to make the picture is focus in the background and blurred at the front. However, I need to find other subject to shoot so this will show it more clear and contrast.
Picture 3
 |
| f/6.3 | 1/3200s | ISO 1600 (Nikon D3000@35mm) |
Review : I shot this using Aperture Priority with f/6.3 . The focus is in duck's eye. The water is a bit blurred. However, the angle i shot this picture not the best angle. I should try again later.
Wednesday, 12 March 2014
Week 5: Basic Shooting and Composition
In this week, we have invited a guest from a Photography Lab which is En. Mohd Puaat bin Ahmad. I mentioned about him in my previous blog in Week 3. However, I spelled his name wrongly. Not Fuad but Puaat instead. I'm sorry En. Puaat. :)
So, En. Puaat was invited to give talk and share his knowledge about photography.
In summary, what i learned from him:
1. First, once you've got DSLR camera, if it is not yours, you reset the setting. After that, adjust setting according to your preferences.
2. Adjust whether you want to use Auto focus or Manual Focus.
3. He told us a few basic setting in DSLR camera.
4. How to set Aperture, ISO, Shutter Speed.
5. Talk on Flash a little bit. This time, I was having like cognitive load. Too much to received . Heheh..
Anyway, thank you En. Phuaat for your useful knowledge. Later, we will meet again in next session which is studio shooting. So, we need to wear beautiful clothes as we may be a model in studio shooting... hikhik..
For composition in photography, Dr. Jamal will teach us on next week class.
Friday, 7 March 2014
Week 4 : Photography and Light
In week four, we learned about Photography and Light. However, I was absent this week because I went for job's interview in Kuching. Alhamdulillah, the job interview went well and I flew back to Johor Bahru on the very next day. Hmmm.. So sad I missed Visual Technology Production class again.
Anyway, as usual, for this week's lesson, I asked my friend, Afi on what things that I missed in class. Afi told me that Dr. Jamal had given us assignment to do throughout this semester. In addition, the e-learning also helps me to download notes and get reference from this week's lesson. So, even I missed class, I still can catch up this week's lesson from e-learning as in Dr. Jamal updated the e-learning frequently. I am feel very grateful and "syukur sangat".
Alright then, since I'm not attended the class. I learned about the photography and light from variety sources which is given by Dr. Jamal in e-learning. So, I watched this video from YouTube. This video is about Aperture, Shutter Speed, ISO and Light explained-understanding.
Hmm..after I watched it, I think i understand it theoretically. But somehow, I need to try it myself and practice how to use the mode dial : Aperture Priority, Shutter Priority, Manual and Program mode. And how the light influence the outcome of the picture. How the photographer using the light to get the composition they wanted.
This is another video suggested by Dr. Jamal. This video is about 3 basics of exposure and photography. How he relate 3 basics things in photography with animation.
In this week, we also learned about how to shoot in manual mode. In Manual Mode, you can control all : Aperture, Shutter Speed, and ISO. You can refer to this page on How to Shoot Manual mode- Cheat Sheet.
Videos that you can watch about Shooting Manual Mode:
1. How to set Aperture, Shutter Speed and ISO when shooting in Manual Mode
2. Shoot in Manual Mode Pt. 1 - Aperture, Shutter Speed and ISO explained
3. Shoot in Manual Mode Pt. 2 - A Visual Photography Tutorial
In summary, I will try to shoot using mode dial and try to relate 3 basic things in photography and how light also related to them. Wish me good luck.All is well.
Subscribe to:
Comments (Atom)